How To Setup Spotify-TUI With Spotifyd and Pulseaudio
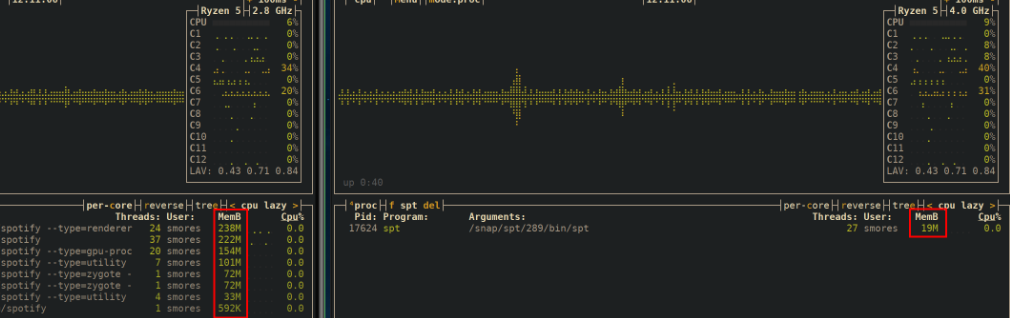
I was recently looking at bpytop and noticed that Spotify was using around 1GB of memory which seemed incredibly high for an application that only needs to do one thing: play music. After looking around out I found spotify-tui which is a Spotify client for the terminal written in rust. I spent a while tinkering with this and found a lot of the documentation out there was lacking. Specifically the documentation around setting up spotifyd. I eventually got the two working together and have been using it without issue. When playing music, Spotify-TUI uses around 19MB of memory compared to the normal application’s ~800MB.
Prerequisites and Assumptions
I will be walking through how to set up spotify-TUI and spotifyd using pulseaudio as the backend audio driver. I had a lot of problems with alsa (the default device for spotify-TUI). Here are the noteworthy things you will need to follow along:
You MUST have a spotify premium account for this to work. Spotify does not allow non-premium users to use the API.
Debian Linux machine with snap.
PulseAudio.
Spotify-tui Installation
The first step in setting up and configuring spotifyTUI, spotifyd, and pulseaudio is getting all the required software.
# Install the spotify-tui program
sudo snap install spt
# Install pulseaudio
sudo apt install pulseaudio
Next we need to configure spotify-tui to connect to Spotify’s API.
The documentation provides fairly clear steps:
- Go to the spotify dashboard and login.
- Click “Create an app”.
- Give it a name and a description and click create.
- You will need both the Client ID value and the Client Secret.
- Click edit settings and under redirect URIs enter:
http://localhost:8888/callback. - Click save.
- Run spotify-tui in your terminal by typing
spt. - Enter your Client ID and Client Secret seen at step 4.
- Your browser will open and ask you for permissions. Accept all. .
- Done.
Great, you’ve not set up spotify-tui. It will take some time to get used to the controls but after a few days you’ll have no issues. Next we need to install Spotifyd.
Installing and Configuring Spotifyd
Spotifyd is a very lightweight Spotify client that is needed to link with spotify-tui. To install it, we first need to grab it from github.
# Download the spotifyd tool
git clone https://github.com/Spotifyd/spotifyd
# Change into the spotifyd directory
cd spotifyd
# Compile the tool with the pulse audio features
cargo build --release --features "pulseaudio_backend"
# Move the compile binary to your path
# This needs to be ran with sudo because non-root users do not have
# permissions to write to your path (this is for security reasons)
sudo cp target/release/spotifyd /usr/bin/
Next we need to create the spotifyd configuration file that allows us to tell spotifyd how to authenticate to Spotify as well as some configurations.
# Make the spotifyd configuration file directory
# the `-p` creates all directories needed if they don't exist
mkdir -p ~/.config/spotifyd/
# Open the file in vim, you could also use nano if you'd like
vim $.config/spotify/spotifyd.conf
This is where you define your configurations. This is mine, you just need to change your username, password, and (optionally) device name.
[global]
# This is your spotify account name. Not your email
username = "<your username>"

# Note that this will be a plaintext password. Make sure it is a
# unique password that is not used anywhere else. We will make this
# file only readable by the root user to *help* mitigate the security risk.

password = "<your password>"

backend = "pulseaudio"

# The device name can't have spaces
device_name = "spotifyd"
device_type = "computer"

# Audio bitrate
bitrate = 320

# Create a cache directory but does not use it
cache_path = "/home/USER/.cache/spotifyd"
no_audio_cache = true

# Set the inital volume of spotify to 100
initial_volume = "100"
# My audio was a bit quiet. You can make it a bit louder by chaning the gain
normalisation_pregain = 10
zeroconf_port = 4444
Next we should change the file permissions so that it is only readable by our user, and root. We want to do this so that no one can read the file with our password in it besides the root user or someone logged in as our user. Again, it is NEVER best practice to have passwords in configuration files, make sure you understand the risk before doing so.
# Set the file permissions to not be readable by other users
sudo chmod 640 ~/.config/spotifyd/spotifyd.conf
Now that spotifyd is setup, we should create a systemd service so
that it will automatically start up. systemd is a (contentious) system and service
manager. We can create a file in one of the various systemD look up
paths that will be automatically executed at startup. We also can
control the systemd process by issuing the command
sudo systemctl [status|start|stop|restart] spotifyd.service.
Here is how you create a systemd unit.
# Create the file and open it
vim /etc/systemd/system/spotifyd.service

# Copy and paste this. I got this from https://zubairabid.com/spotifyd.html

[Unit]
Description=A spotify playing daemon
Documentation=https://github.com/Spotifyd/spotifyd
Wants=sound.target
After=sound.target
Wants=network-online.target
After=network-online.target

[Service]
ExecStart=/usr/bin/spotifyd --no-daemon
Restart=always
RestartSec=12

[Install]
WantedBy=default.target
Next we need to start the service and make sure it starts when we boot our machine.
# Starts the systemd service
sudo systemctl start spotifyd.service

# Check to make sure it is running
sudo systemctl status spotifyd.service
# You may see a warning saying "No config file specified".
# I'm not sure why this happens but it shouldn't matter as it still works
# If you know why this is happening, let me know!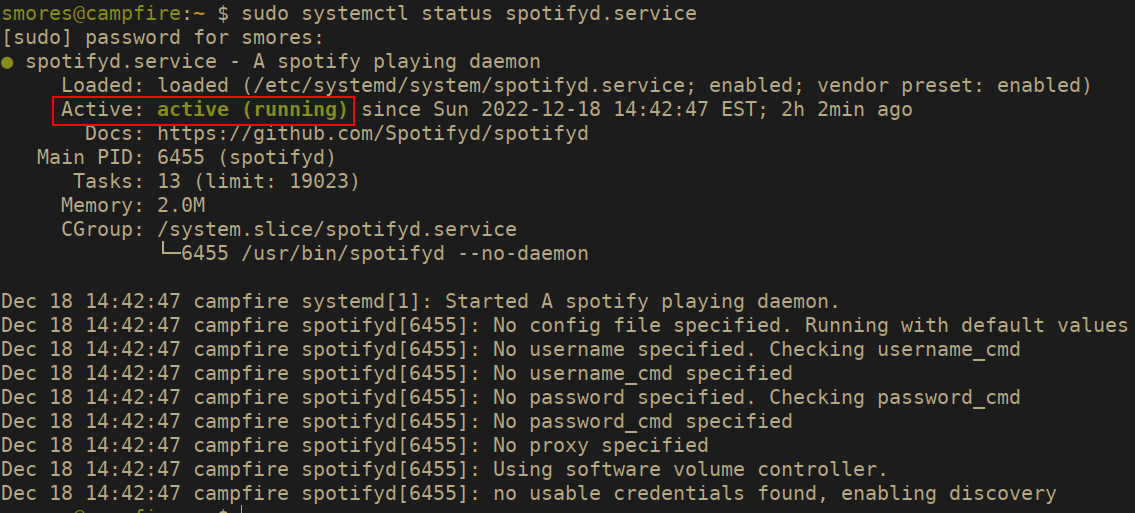
That should be everything you need to get your services up and
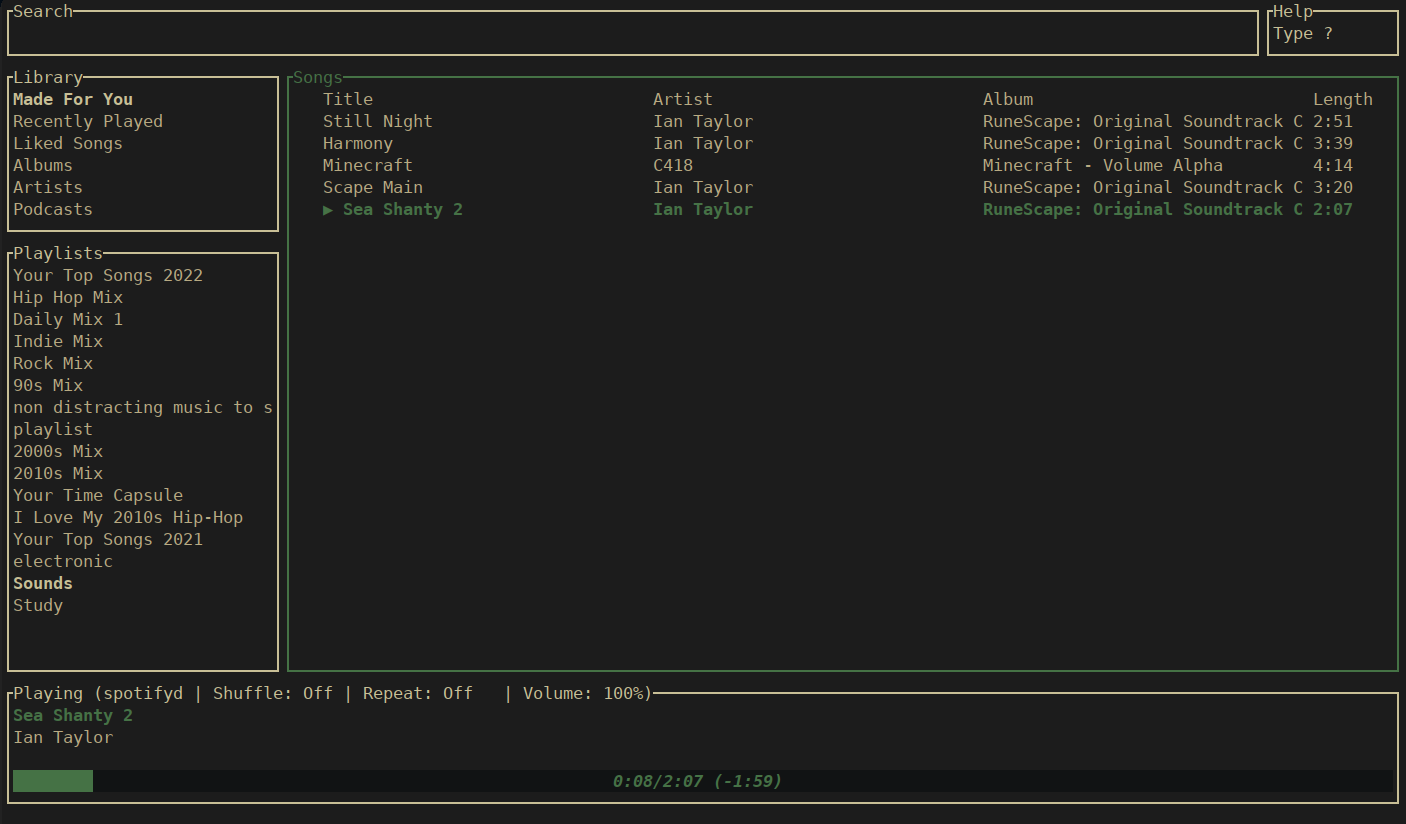
running. Now all you need to do is launch spotify-tui again using the
spt command. Make sure you select your device (the device
name is the one we defined earlier in the device_name value
of spotifyd.conf). To select your device, once inside of
spotify-tui, press d and use the arrow keys to select
whatever you called your device. The press enter. That is all you need
to do. You can now pretend like your an elitist Linux user by playing
your music from the terminal. :)
References
Have any questions?
Do you have any questions or comments? Feel free to reach out to me on any of the social platforms -> https://grahamhelton.com/links/